Looks like a thumb drive, types like a keyboard.
November 18, 2021
Author: Miranda Pagarelski
What is a Rubber Ducky?
The Rubber Ducky we’re talking about isn’t the bath toy! A USB Rubber Ducky is a keystroke injection tool that looks like a basic flash drive.
When it is plugged into a computer, the computer will recognize it as a regular keyboard and automatically execute the payload stored on the microSD.
Rubber Ducky Parts
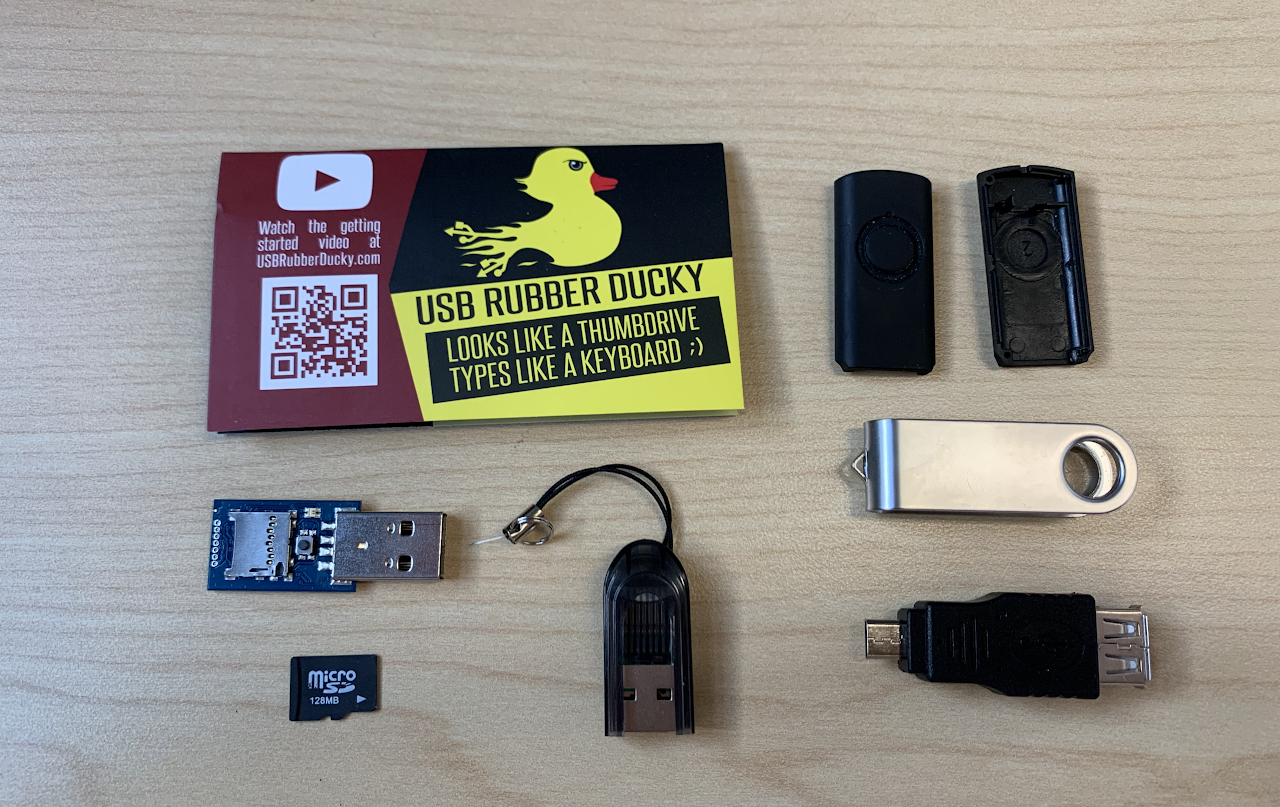
USB Rubber Ducky Parts
- Mini “keyboard” adapter
- The keyboard adapter consists of a silicon chip with a CPU and a slot that you can insert the microSD card in. It sends in keystrokes just like if they were to come in through a keyboard, essentially mimicking human input.
- MicroSD card
- This is where you will put your payload. The only thing that needs to go on the microSD card is a singular inject.bin file. If there is more than one, the USB Rubber Ducky won’t know what to run!
- MicroSD-to-USB adapter
- This adapter allows you to mount the microSD card onto your machine so it registers as a regular USB adapter. It allows you to easily transfer your payload to the microSD card.
We consider the parts listed above to be the most important to creating your first payload. At minimum, you will need these pieces to properly use the USB Rubber Ducky. The parts listed below can help when using the USB Rubber Ducky, but they are not necessarily needed.
- Case for “keyboard” adapter
- The case offers “camouflage” to the keyboard adapter to make it look like a regular USB flash drive.
- USB-to-microUSB adapter
- This allows the Rubber Ducky to be used on devices that use microUSBs. Common examples of this are Android devices.
Initial Ducky Test
When you originally received your USB Rubber Ducky, there should be an inject.bin file already on the microSD card. Simply insert the microSD card into the USB Rubber Ducky, and plug that into a USB port onto your computer.
This injection should run notepad.exe and type a few things into the document.
Downloading the Duck Encoder
Download the Duck Encoder from this Github wiki:
https://github.com/hak5darren/USB-Rubber-Ducky/wiki/Downloads

Download duckencoder from hak5darren’s GitHub Wiki.
Make sure you download the latest version, and that you remember where you decided to download it. You’ll need to know this for later.
Creating a Payload with Duckyscript
Duckyscript Syntax
When writing in Duckyscript, each command is on a new line, and can have options that follow. Commands are written in ALL CAPS.
As you are writing your script, don’t be afraid to test commands you want to run in PowerShell or Command Prompt first! This will minimize the possibility of errors when you actually execute the script, and can help you troubleshoot earlier.
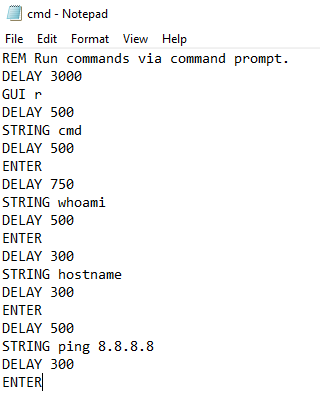
Script that runs commands via command prompt.
*Tip:* Comment your script using the REM command throughout! This will help you understand what you were thinking when you were writing the script, especially if you have not looked at it in a long time.
Compiling Your Script
Now that your script has been written, it’s time to compile it. You can do so by using the following command in command prompt:
java -jar C:\Windows\Temp\duckencoder.jar -i scriptfilename.txt -o inject.bin
In the above command, -i specifies the input file and -o specifies the output file.
Compiling the demo_script.txt file
*Note:* The output file must be named inject.bin, or the ducky will not know what to run.
If you run into issues compiling your inject, it could be possible that Java is not downloaded on the device you are using. Download it, and try again!
Test
Now that you have compiled your script, you are ready to test! Plug in your USB Rubber Ducky to the computer and watch the commands execute.
If something isn’t working properly, look back at your code and modify it. Then, test it again!
If there is a red light displayed on your Rubber Ducky, either the script wasn’t compiled correctly or the microSD isn’t sitting properly.
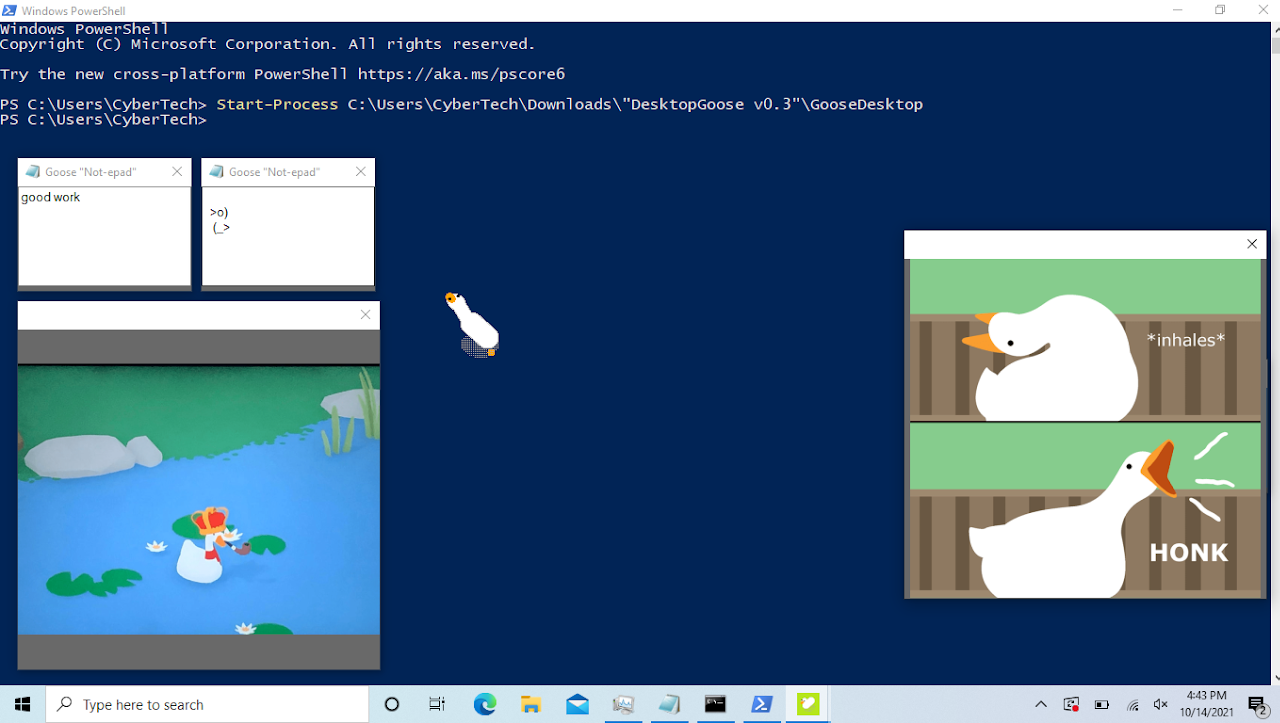
Ducky Script execution.
For our script, we did a few things. First, we opened up notepad and typed in some things for the user to see. From there, we opened command line and ran a few commands. Then, we opened PowerShell and pulled our GitHub repository from the web. After the repository was obtained, it was unzipped, and the Desktop Goose program by Sam Chiet was started.
If you would like to see the full script, or any other demonstration scripts, head over to the CyberTech GitHub repository!
Resources:
- “Desktop Goose by Samperson.” Itch.Io, https://samperson.itch.io/desktop-goose. Accessed 18 Nov. 2021.
- “Downloads · Hak5darren/USB-Rubber-Ducky Wiki.” GitHub, https://github.com/hak5darren/USB-Rubber-Ducky. Accessed 4 Nov. 2021.
- “Ducky Script – the USB Rubber Ducky Language.” Hak5, https://docs.hak5.org/hc/en-us/articles/360010555153-Ducky-Script-the-USB-Rubber-Ducky-language. Accessed 18 Nov. 2021.
- “Duckyscript · Hak5darren/USB-Rubber-Ducky Wiki.” GitHub, https://github.com/hak5darren/USB-Rubber-Ducky. Accessed 4 Nov. 2021.
- Gfycat. Rubber-Ducky – Create, Discover and Share Awesome GIFs on Gfycat. https://thumbs.gfycat.com/CautiousRipeBrant-size_restricted.gif. Accessed 4 Nov. 2021.
- USB Rubber Ducky – Hak5. https://docs.hak5.org/hc/en-us/categories/360000982554-USB-Rubber-Ducky. Accessed 18 Nov. 2021.
- “Writing Your First USB Rubber Ducky Payload.” Hak5, https://docs.hak5.org/hc/en-us/articles/360010471234-Writing-your-first-USB-Rubber-Ducky-Payload. Accessed 4 Nov. 2021.